[adinserter block=”2″]
There are many different errors one might make while pressing the
bar, either overhead or from the bench: poor eye gaze direction, too
wide or narrow a grip, no leg drive, driving your ass up off the
bench, and the list goes on. As coaches, it is our job to see which
issues are happening, order them from most to least important, and
instruct or “cue” the lifter to success.
We must also be
cognizant of the lifter’s ability to take in and process information;
in the midst of a training session, we cannot overload a lifter –
especially a novice – with a 15-minute lecture on why we want some
moment arms but not others. We need to fix them, now. Because
of this, we have to focus on the fundamental parts of the movement,
while saving some of the less egregious errors for another day or
another session, a juggling act that can be tough to pull off, but
one that nonetheless comes with the territory of being a coach.
What’s harder still is
the novice lifter trying to figure it all out on their own in the
garage – I’ve been there, and I know the challenge. You’ve watched
the videos, which are well-made, concise, and focused on the
fundamentals. Maybe you’ve purchased the book, which is absolutely
packed with well-articulated arguments for why and how we do what we
do based on the most up-to-date information we have in the field of
strength training.
Perhaps you’ve been
able to attend a camp or seminar, giving you an edge over most of the
other trainees in your similar situation. All of those are great, but
none of those measure up to being coached by an SSC. So you’re doing
the best you can, and maybe you’re doing really well, but many of the
little details go unthought of and unnoticed. For those novice garage
warriors out there who have a nice grasp on the fundamentals, here’s
a very brief overview of what we’re trying to get the elbows to do in
the pressing movements.
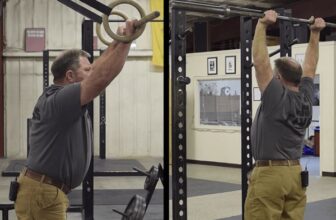
Elbows
in the Press
The elbow positioning
in the press plays a crucial role in a successful rep. We’re really
looking for two things: 1) The elbow is just in front of the bar when
viewed from the side, and 2) the elbow is directly in line with the
fist allowing for a vertical forearm at the start of the movement,
when viewed from back or front.
The elbow position
relative to the bar – slightly in front of it – affords us the
opportunity for an efficient bar path, which becomes more and more
necessary as the weight on the bar increases; small bar path
deviations in the squat or the deadlift, for example, are inefficient
and should be avoided, but can often be overcome with enough grit. If
the bar path is out in front of you an inch on a PR Press, you’re not
making that rep. We have all experienced the glory of grooving a
Press PR that left us thinking we had 10 more pounds in the tank only
to come back 2 minutes later and fail to get the bar above our nose.
Bar path will make or break you in the press, so get that handled
early.
Placing the elbow (the
olecranon process, the proximal end of the ulna) just in front
of the bar creates a vertical radius
(the other bone) – the radius-part interfaces with the wrist, and
is what carries the drive to the bar. A vertical radius
effectively eliminates moment arms between the grip and the elbow,
between the elbows and shoulders, and between the grip and the
shoulders. It also forces you to build tension within the system; the
elbows will not just stay where we want them to – attention must be
paid, and work must be done to make this happen. By working to keep
the elbows and armpits tight we’re also going to build tension,
making this a “kill two birds with one stone” type of situation.
Keep them in tight and bounce the triceps off the lats.
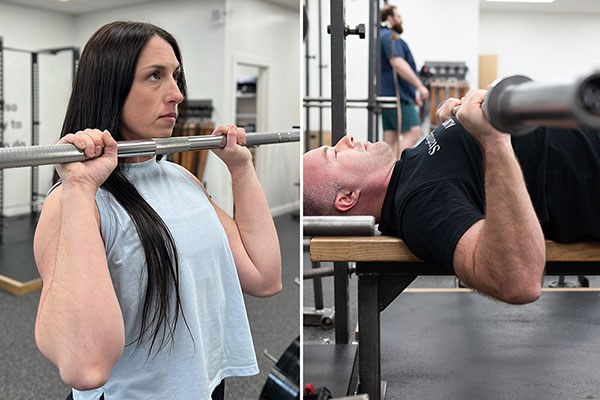
Elbows
in the Bench
Just as with the press
the elbow position in the bench press really cannot be overlooked.
Again, we are looking at a couple aspects of the elbow position: 1)
The elbow/olecranon process needs to maintain its position directly
under the bar when viewed from the front or back and 2) the angle at
the armpit, made up by the humerus and the torso, changes throughout
the movement, from lockout to chest and back; this angle should be
essentially zero at lockout and somewhere around 75 degrees when the
bar touches the chest, though this can vary quite a bit depending on
an individual’s anthropometry and flexibility (back arch).
Similar to the press,
keeping the elbow under the bar and the forearm vertical allows for
optimal force transfer to the bar; if we can avoid the creation of
moment arms between the bar and elbow, we avoid the need to overcome
unwanted leverage created by these moment arms.
The elbow position
relative to the torso – the armpit angle – is the one we concern
ourselves with for the sake of shoulder health. The act of pulling
the elbows down a little from 90 degrees to somewhere around 75
degrees doesn’t actually make the movement more efficient. This
position avoids impingement of the shoulder, which will happen if the
armpit angle is kept at the more mechanically efficient 90 degrees.
We give up mechanical efficiency for a better chance of keeping the
shoulders out of harm’s way.
The
Point of All This
Of the many potential
errors a trainee can make, how the bar comes down in the
pressing movements is one that can cause serious issues, but largely
will go unnoticed if training alone or with other inexperienced
training partners. After all, we’re just letting gravity bring the
bar back down, right? Well, kind of, but there’s some nuance: I am
not suggesting you radically slow the descent of the bar when you
bring it down in the pressing movements, but I would have you control
the bar on the way back down to prevent unnecessary momentum from
accumulating.
The cruise control in
your car, for example, can be set at 10 mph or 80 mph, but in both
cases, the pace is controlled. How fast the bar travels back down
will vary depending on the trainee; find the pace that doesn’t fight
gravity too much and also allows you to control the bar path on the
way down. Here’s how I like to think about controlling the bar on the
way down.
“Lead with the
elbows.” What does this instruction mean? Well, for the press –
if we’ve done our job at taking the setup seriously and getting into
the correct position before the bar is unracked – the elbows are
good to go for that first rep. Elbow under the fist and tucked in
tight to the torso. You step out, get a big breath, throw the hips,
and throw the bar through the ceiling, finishing with a hard shrug to
lock out the rep.
Now what? Well, what
many lifters do at this point is simply let the bar drop down toward
the start position with no regard for the elbow. The problem with
this is that often times this pushes the elbows down behind the
proper start position – behind the bar – and sets up the lifter
for an inefficient bar path that will push the bar away from their
shoulders and mid-foot on the next rep.
The distance between
the bar and the shoulder is the critical lever in a press. You can
probably get away with this early on in your training career because
the weight is light, and you can grind through a shitty bar path to
lockout. But the ability to grind through it will not last long. At
this point the best-case scenario is that you adjust between each
rep, get the elbows back in their rightful position, and salvage the
bar path for the rest of the set. But again, this will not last. The
press is hard work, and standing there wasting precious seconds
adjusting your elbows between each rep is a losing strategy.
Do this instead: After
lockout, pull the elbows back down into the start position.
Let the elbows lead the bar back down. If you get the elbows where
they should be you’ll have put the bar back where it should be –
two birds, one stone. Now, it is important to understand that I am
not suggesting you waste energy by artificially slowing the bar down
as you move from lockout back to start position, but we can allow
gravity to do its thing and use the elbows to steer the bar on the
way down.
Same
for the Bench?
Even though the bench
press, unlike the press, starts at the lockout position at the top,
the same principle of leading with the elbows still applies. From the
lockout position focus on leading the bar down to the touch point
with the elbows. Another way to think of this is to pull the bar down
to the touch point. Again, this does not mean you should be moving
the bar slower than is necessary; the goal here is to control the bar
while leading it to the touch point with the elbows. Cruise-control,
remember?
The cool part about
this is that by leading the bar down with the elbows you have a great
probability of keeping them under the bar as well as maintaining the
correct armpit angle, since the elbow position controls this angle.
When you hit the touch point on the chest you must have also kept the
appropriate angle of the humerus, the two are tied together (I don’t
want to keep using the same bird expression, but you get it).
The
How – Not the Why
To be honest, I don’t
really care too much if you understand why the elbows should be
positioned in the way we advise or not – at least not right now.
When you want that knowledge, I suggest you pick up a copy of the
Blue Book from The Aasgaard Company.
My goal is to try and do for you what many other great SSCs have done
for me and give you easy instructions to follow that will
significantly improve your performance. If you’re having to reset
between each rep on the press or your touch point in the bench is all
over the place, try Leading With The Elbows the next time you
train, because a better down makes for an easier up.
Discuss in Forums
[adinserter block=”2″]
Credit : Source Post