[adinserter block=”2″]
You can reduce the negative effects of
bar path errors in the press by widening your stance. That is the
only actionable piece of advice in this whole article. What follows
is the very wordy discussion on why widening your stance will make
your press more efficient. Reading it will improve your
understanding, but it is not necessary.
Out of the five main lifts in the
program, the press is the most sensitive to deviations from the
model. In the model, when viewed in the sagittal plane, the barbell
remains aligned vertically with the shoulder joint and mid-foot
balance point. This prevents unnecessary moment arms from forming to
the anterior and the posterior of mid-foot as the barbell is pressed
up to lockout. This line from the mid-foot up to lockout can be
thought of as a narrow slot. At a heavy-enough weight, once the bar
drifts out of this slot due to a technique error, the press will stop
dead in its tracks, resulting in a failed rep which otherwise would
have been completed if the bar path had stayed in the slot.
Keeping the bar path in the slot is a
difficult challenge, especially if you are pressing heavy and your
brains are starting to leak out of your ears. Now, there are some
very obvious things that you can do to make your press as efficient
(and as heavy) as possible. First, you can buy a copy of Starting Strength, read the thing, read the thing again paying attention this
time, and then finally apply the technique instructions. You can also
attend a seminar or a camp hosted by a coach. Or you could go to a Starting Strength Gym or an affiliate gym. If you are far away from in-person
coaching you can hire a coach online to fix your press (and all the
other stuff you’re doing wrong).
Let’s say that you have done
everything in your power to make sure that your technique is on
point. That means that every rep will be perfectly aligned with the
slot, right? No. There will still be an amount of variance with each
and every single repetition that you do. This is unavoidable because
the overhead press is a sentient pile of a couple trillion cells and
at least two social media accounts working as a team to put a heavy
thing up as high as it can. There will be some unavoidable
inconsistency.
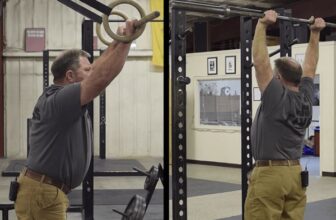
You can mitigate against the balance
problems that this wobble causes by widening your stance and
artificially making yourself shorter. I have a decent press and not a
big press. I developed a wider stance over time without really
thinking about it. I have noticed that big pressers also used a wider
stance. At first I assumed that it was to accommodate our gigantic
balls, but there were indications that this was not the case since I
saw women doing this too. Now in our brave and stunning modern
society I cannot completely rule out women having balls, but I still
looked for an explanation that would apply to both sexes. It turns
out that there is a simple mechanical reason as to why a wider stance
provides an advantage in the press.

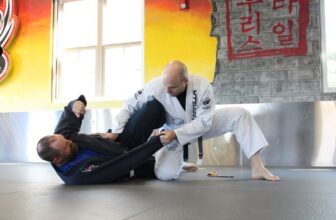
The
wide stance will artificially shorten the legs by turning the leg
length from a straight line up and down perpendicular to the ground
to a hypotenuse out to the side. This trick is used to great effect
by sumo “deadlifters” to reduce the range of motion of the pull.
Luckily, widening the stance in the overhead press will not affect
the range of motion of the lift, so it is not cheating. It is also
the only practical means by which to shorten the lifter during a
press. Making your torso shorter is only really possible with
industrial or farming accidents and making your arms shorter by
widening your grip will introduce those nasty bad moment arms between
your hands and shoulders in the frontal plane. Widening the stance is
therefore the only feasible method left to make yourself shorter.

How does making yourself shorter actually help your press? I will explain with some simple diagrams and then with some trigonometry and mechanics. Here is the simple one. In basic mechanics, a force applied to an object that is offset from the object’s center of mass or its balance point will result in a rotation or turning force called a moment. The straight line up and down is the perfect bar path over the middle of the foot. Forces applied down along that straight line will result in compression, which is fine, it’s just supported by the skeleton and requires no work. The angled line in the figure above represents a bar path error. The horizontal line represents the distance between the barbell and the middle of the foot. The amount of moment is the product of the horizontal line and the amount of force applied. You want the horizontal distance to be as little as possible to minimize the moment. As you can see the upper horizontal line is longer than the lower horizontal line, meaning that with the same angular error, there is less resultant moment to overcome. If you are math and physics adverse, just think: flat line big number bad when pick up weight. Unless the flat line is associated with the hips, then we like it.
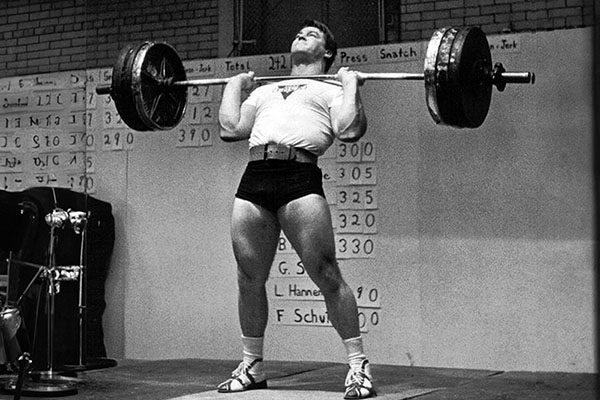
Here comes the trigonometry and
mechanics. At lockout, the vertical distance the lifter gets the bar
to becomes a potential moment arm. If he is perfectly vertical, the
moment arm will be zero. If Spiderman were standing on a wall and
pressing a weight perpendicular to the direction of gravity, the
moment arm would be the total horizontal length of Spiderman. The
horizontal displacement of the weight from the mid-foot is also the
length of the moment arm and it can be determined by multiplying the
sine of the angle between the vertical and the line from mid-foot to
the weight by the length of the lifter from his feet to his
outstretched hands at lockout. The formula to determine the moment is
simply that horizontal distance multiplied by the force applied at
the hands (the barbell).
We have a lifter who is pressing 200 lb and at lockout will have hands reaching up to a total height of 80
inches. With a wider stance, he reduces the height at lockout to 76
inches. He also has a tendency to lock out behind mid foot sometimes,
resulting in an angle between the ideal vertical bar path and a line
formed between the mid foot and the final position of the barbell of
two degrees.
The first step will be to determine the
horizontal length of the moment arms at the two heights.
Normal Stance
- Horizontal distance = sin(angle) x
length - Horizontal distance = sin(2) x 80 in
- Horizontal distance = 2.8 in
Wider Stance
- Horizontal distance = sin(angle) x
length - Horizontal distance = sin(2) x 76 in
- Horizontal distance = 2.6 in
The next step is to determine the
amount of moment force that results from the two stances.
Normal Stance
- Moment = Moment arm length x force
- Moment = 2.8 in x 200 lb
- Moment = 560 in*lb
Wide Stance
- Moment = Moment arm length x force
- Moment = 2.6 in x 200 lb
- Moment = 520 in*lb
After that, it is simple matter to find
out that the wider stance results in a moment force about the
mid-foot that is 40 in*lb less than the narrow stance, or an
approximately 7% relative reduction of the moment loading resulting
from an error at lockout. Small distances become significant quickly.
Now we need to go over the far more
common press error of the shoulders getting too far away from the bar
in the sagittal plane. Widening your stance will not help with this.
Remember, in the most mechanically efficient press, the mid-foot,
shoulder joint, and barbell all remain aligned vertically. The press
is taught with a hip bounce to get the face out of the way of this
vertical line and to provide a stretch reflex to get the weight
started upward.

Oversimplified
presses seen from the side. The figure on the left has laid back
which has created an unnecessary moment arm between the shoulder and
the barbell. The figure on the right has brought his hips forward
while keeping his shoulder in line with the barbell and midfoot,
loading the hip, trunk and leg musculature while avoiding a moment
arm between the shoulder and barbell.
A lifter can commit the error of
throwing his shoulders back, instead of reaching forward with his
hips. This will create a longer horizontal distance between the
shoulder and the barbell, which results in an unnecessarily long
moment arm about the shoulder, resulting in a failed lift. Remember
that we operate moment arms to move loads – they are our
mechanical tools for applying and multiplying force. But if the
moment arm gets longer than it must be, the load multiplies its force
against us, and it takes more force to move it than if the
leverage is efficient. If you lay back too far, even a light weight
gets hard to press if the moment arm against your shoulder is too
long. Think about reaching forward with the hips, not laying the
shoulders back.
If you’ve made it this far, thanks for
reading.
Discuss in Forums
[adinserter block=”2″]
Credit : Source Post